How to configure gre tunnel on cisco router
Asalam o alikum, in this tutorial we will learn How to configure gre tunnel on cisco router
Configuring GRE tunnel on Cisco router is very easy and has 3-4 steps. Go through this tutorial for gre tunnel configuration step by step
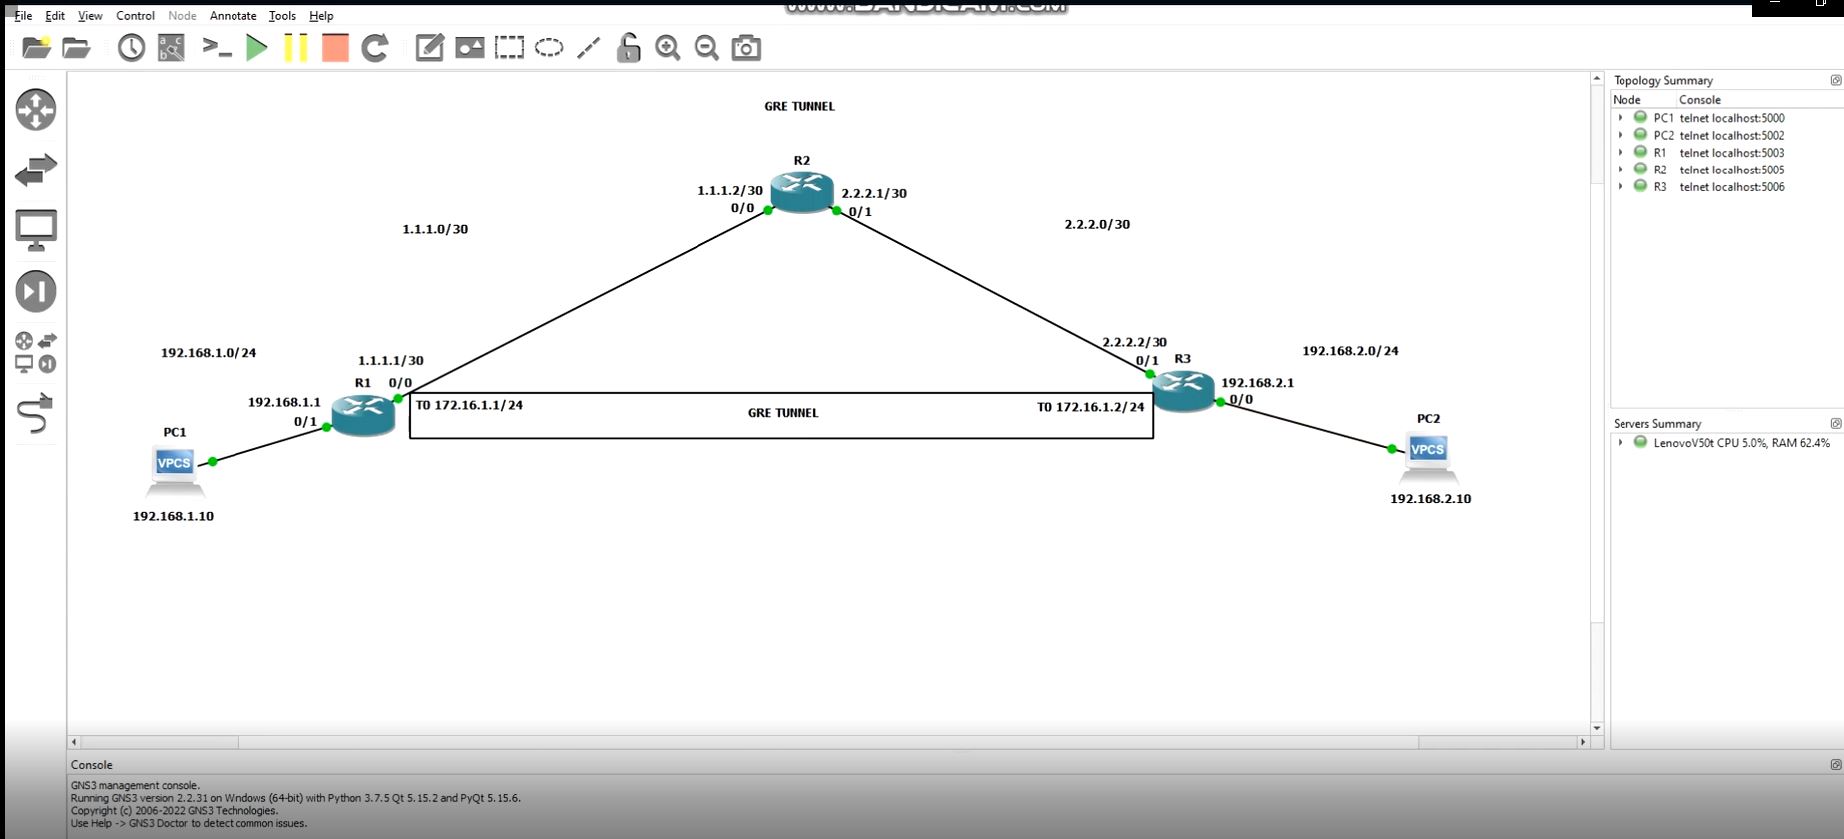
For this tutorial I have created a scenario as shown in figure below , in which we have 3 Routers (R1, R2, R3) and 2 PC’s connected to R1 and R3.

First we will assign IP Addresses on Routers and PCs . In next step we will enable IP Routing such that PC1 could ping PC2. We will also take trace route from PC1 to PC2 .
Next we will create GRE Tunnel between R1 and R3. Then we will route traffic over the tunnel and again take trace route from both PCs to each other. we will see that now traffic will go through GRE tunnel.
Let’s start !
STEP 1: Assign IP Addresses
As per our scenario , we will assign IP Addresses as follows:
R1 fa0/0 : 1.1.1.1/30 ; R1 fa0/1: 192.168.1.1/24
R2 fa0/0: 1..1.1.2/30 ; fa0/1: 2.2.2.2/30
R3 fa0/0: 192.168.2.1/24 ; fa0/1: 2.2.2.2/30
PC1: 192.168.1.10/24 ; PC2: 192.168.2.10/24
To assign IP Address on Router ,Login to Router and issue following commands
R1 # conf t
R1(config)# int fa0/1
R1(config-if)#ip address 192.168.1.1 255.255.255.0
R1(config-if)#no shut
R1(config-if)#exit
R1(config)# int fa0/0
R1(config-if)#ip address 1.1.1.1 255.255.255.252
R1(config-if)#no shut
R1(config-if)#exit
configure IP Addresses on R2 & R3.
Now Open PC1 . To assign IP type following command:
ip 192.168.1.10 255.255.255.0 192.168.1.1
Similarly, assign IP on PC2.
When we are done with assigning IP Addresses, we move to next step.
STEP 2: Configuring Static Routing in Cisco Routers
We will now add static routes such that PC1 is able to ping PC2.
For this we will add default routes on R1 & R3 towards R2 and routes of networks 192.168.1.0/24 & 192.168.2.0/24 on R2
R1(config)# ip route 0.0.0..0 0.0.0.0 1.1.1.2
R2(config)# ip route 192.168.1.0 255.255.255.0 1.1.1.1
R2(config)# ip route 192.168.2.0 255.255.255.0 2.2.2.2
R3(config)# ip route 0.0.0..0 0.0.0.0 2.2.2.1
After configuring IP routes, Ping PC2 from PC1 to verify connectivity

After successfully pinging take trace route from PC1 and PC2 to eacho other.
You will notice when we take trace of PC2 from PC1 it shows following path
- 192.168.1.1 (R1)
- 1.1.1.2 (R2)
- 2.2.2.2 (R3)
Now take trace route to PC1 from PC2
- 192.168.2.1 (R3)
- 2.2.2.1 (R2)
- 1.1.1.1 (R1)
STEP 3: Configuring GRE Tunnels on R1 & R3
In this step we will configure gre tunnel on our cisco router
For this we will create a tunnel named “tunnel 0” on R1 & R3.
Creating a tunnel is very easy and only has 4 steps
Create a tunnel interface and give it a name like “tunnel 0”
Assign an IP Adress to that tunnel
Specify tunnel source
Specify tunnel destination
On R1 we will create tunnel 0 and assign it an IP address “172.16.1.1 255.255.255.0”
on R2 we will create tunnel 0 and configure IP “172.16.1.2”
After creating tunnels we will ping IP addresses of tunnel from both Routers
Upon successful creation of tunnel we will route traffic of PC1 & Pc2 via TUNNEL 0
Finally we will take trace again and will notice the difference that instead of going to R2 , traffic will pass trough tunnel.
To configure tunnel , Go to Router 1 and issue following commands
R1(config)# int tunnel 0
ip address 172.16.1.1 255.255.255.0
tunnel source 1.1.1.1
tunnel destination 2.2.2.2
Now go to R3
R3(config)# int tunnel 0
ip address 172.16.1.2 255.255.255.0
tunnel source 2.2.2.2
tunnel destination 1.1.1.1
If you have followed the steps mentioned above, your tunnel interface would be up and you would be able to ping it from your Router.

STEP 4: Route traffic of PC1 & PC2 via GRE tunnel
on R1 & R3 we will configure static routes of networks 192.168.1..0/24 & 192.168.2.0/24 via tunnel 0
R1(config)# ip route 192.168.2.0 255.255.255.0 tunnel 0
R3(config)# ip route 192.168.1.0 255.255.255.0 tunnel 0
After this step, take trace routes from both PC’s
Trace of PC2 from PC1::

Notice the difference between the 2 traces, after tunnel is configured traffic is directly sent via tunnel.
Trace of PC1 from PC2::

That’s it guyz. I hope you enjoyed this tutorial. don’t forget to watch the video tutorial.
